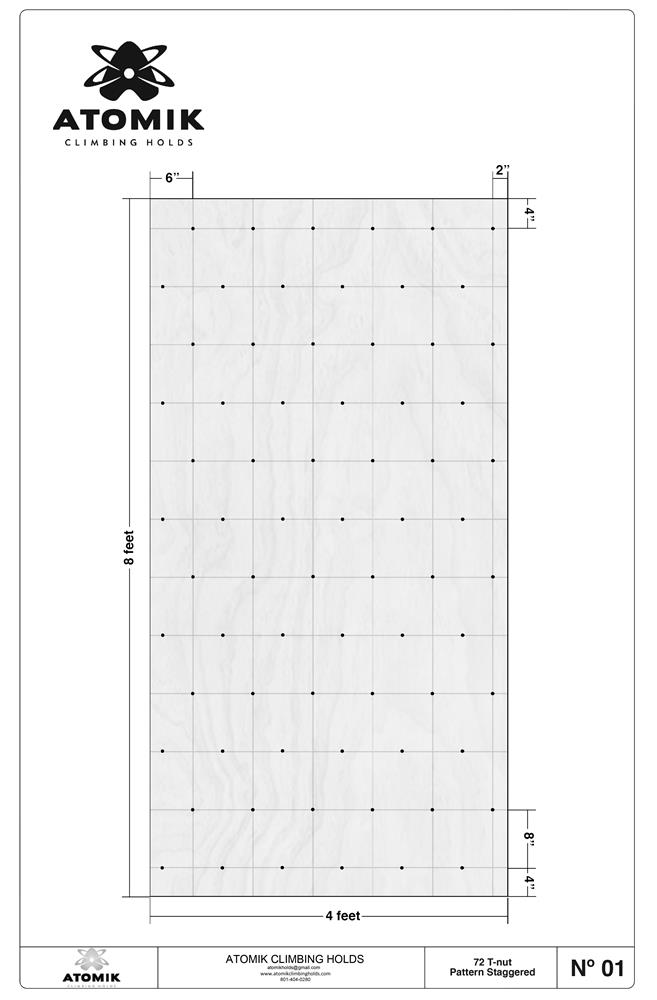
T-nut Layouts

72 T-NUT LAYOUT

CLICK ME FOR THE 72 T-NUT PATTERN LAYOUT PDF

The standard T-nut layout for years has been the 72 T-nut pattern. 72 T-nuts is how many T-nuts you will install on a 4' x 8' sheet of 3/4" ACX plywood. You would choose this pattern if you are building a school wall or a trampoline park. There are limitations with the 72 pattern as the vertical space between t-nuts is 16" apart in a straight line. That can leave a lot of open space between holds. If you want to set routes and boulder problems, scroll down to the 128-pattern. 


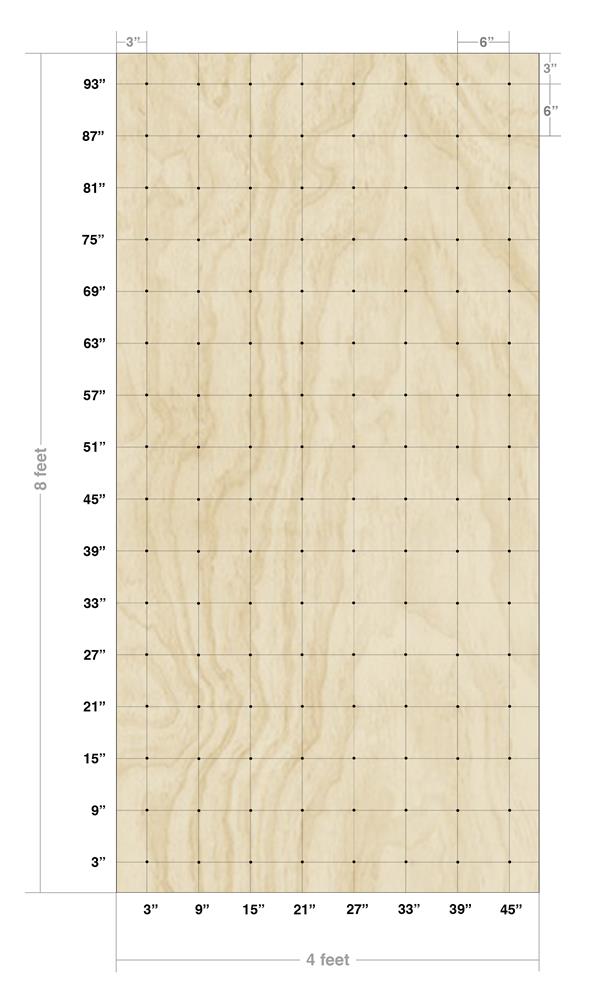
128-GRID T-NUT LAYOUT

CLICK ME FOR THE 128 GRID T-NUT LAYOUT PDF

The 128 T-nut grid pattern uses 6" spacing to provide more hold placement options than the 72 T-nut pattern panels. This is the recommended T-nut pattern for System walls since they must be symmetrical with a tight T-nut spacing. This 128 T-nut grid pattern makes setting up repeating holds/moves easy.

How to Drill Multiple Climbing Wall Panels for T-Nuts:


If you're drilling multiple wood panels for t-nuts, you can save time by stacking the panels and drilling them all at once!

Before drilling, clamp the panels together and prop them up off the ground. Use a drill bit long enough to go through all the panels and a small block of wood around 4" long. We used a 12" general-purpose bit. A spaded bit works for drilling one panel at a time; however, the general purpose bit works best with the jig for multiple panels.

Mark the spots where you want your t-nuts. In this example, there are 8 rows of t-nuts across and 16 rows down for 128 t-nuts per panel.

Level and cut a small block of wood with a perpendicular hole in it (we drilled the block on a drill press to make sure the hole was perpendicular to the ground) to ensure that each hole in the panels is perpendicular by holding the block flat to the wood panels and passing the drill through it for each hole.

Quality Control Tip: Always orient your panels so that the front of the panel is face up. When drilling, the pressure being applied to the drill/drill bit blows out the back of the hole as the drill bit passes through the material. Steady pressure is ideal, which will lessen this. However, it is quite difficult to avoid blowouts. So, keep the blowouts on the back side, where the t-nuts get installed.