Building an Artistic Kids Wall
 | ATOMIK How-To Series #9 Building an Artistic Kids Climbing Wall STEP-BY-STEP INSTRUCTIONS Turning a space of blah into a place of happy awesome. | ||
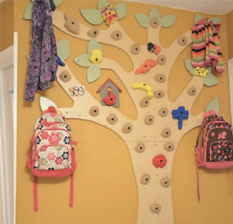
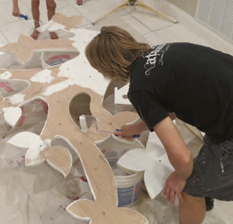
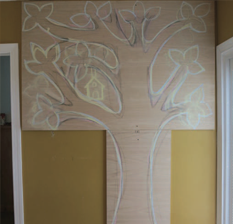 | Building an Artistic Kids Climbing Wall: Step-by-Step (9.2) LOCATION, LOCATION, LOCATION Having a plan and vision will make all the difference. Choose a space that will accommodate your design or vice versa. Locate the studs in your wall and then rough cut your plywood. Tack up your rough-cut panels to your wall. Using chalk, draw out what you want your design to look like. Look for as many places as you can to add details, like a birdhouse. Think ahead and incorporate function to the wall. We made sure tree limbs hung low enough to install holds on the far left and right for hanging things like sweaters and backpacks. Your design needs to cross over as many wall studs as possible so that you can secure your climbing wall with #8 x 3 inch Self Drilling Deck screws. | ||
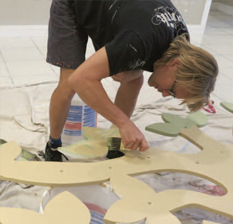
 | Building an Artistic Kids Climbing Wall: Step-by-Step (9.3) TAKING THE TIME TO BE CREATIVE Saw horses or buckets will make cutting easier. Support your project on saw horses, or in this case buckets, and start cutting out your design. A drill with a 1” wood spaded bit will help you get started in the areas that you can’t run the jig saw into such as the hole in the birdhouse. It may seem like a lot of cutting and it is. This is supposed to be fun. | ||
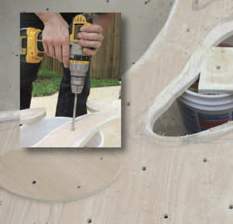 | Building an Artistic Kids Climbing Wall: Step-by-Step (9.4) DRILLING YOUR T-NUT LOCATIONS Knowing where and why the holds will end up. Having extra climbing wall T-nuts for your project never hurts. Think ahead such as how you want the bird to sit in your tree house and where you want the backpacks to hang. Drill 7/16” holes with a wood spaded bit or Forstner bit. T-nut locations should be placed so that all of your functional needs are met. | ||
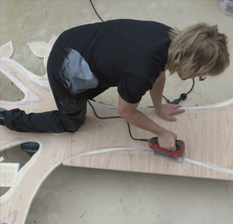
 | Building an Artistic Kids Climbing Wall: Step-by-Step (9.5) THE ART IS IN THE DETAILS Nice smooth edges. Take your time and sand the wall. Sanding will eliminate rough spots so you and the kids don’t get splinters. | ||
 | Building an Artistic Kids Climbing Wall: Step-by-Step (9.6) PRIMING Sealing raw wood is important for color vibrancy. Use a high-quality primer such as KILZ Premium to seal the wood preparing it for paint. You can skip this step if you use a Paint/Primer all-in-one mix found at most hardware stores. | ||
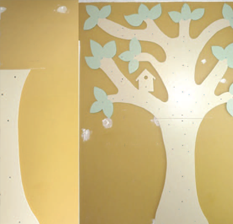
 | Building an Artistic Kids Climbing Wall: Step-by-Step (9.7) PAINTING Texture - To add or Not to add. Texture serves 2 purposes. It adds a more rock-like look to your panel and most important, it alleviates your holds from sticking to a wall that has no texture. Holds never stick to bare plywood. Paint your texture with a heavy nap roller. Have a 2nd person spread out the texture with a 4” paintbrush at the same time. Once the textured panel is dry, follow up with any paint detail colors you may want to add like the birdhouse and leaves. | ||
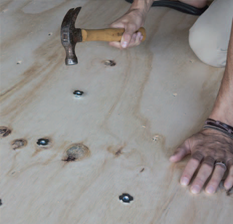 | Building an Artistic Kids Climbing Wall: Step-by-Step (9.8) INSTALLING THE T-NUTS A loud part of the project. Hammering T-nuts into the backside of your panels can be very loud so it is recommended that you wear ear protection. Hammering t-nuts outside alleviates the echo that is created indoors. Be sure to hammer the t-nuts square into your holes. T-nuts hammered in crooked create undesirable results when installing the holds. | ||
 | Building an Artistic Kids Climbing Wall: Step-by-Step (9.9) GETTING THE FINISHED PANEL BACK UP A friend indeed. Have a second person handy to help you get the panel back up and secure to your wall using #8 x 2” screws. This wall has no furring strips as the design does not create that option. This means your bolts will dig into and through the drywall. You will have to do more drywall repair when the wall comes down. | ||
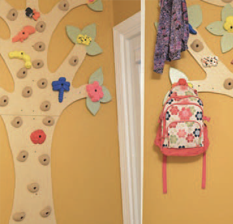 | Building an Artistic Kids Climbing Wall: Step-by-Step (9.10) HOLDS AND FINISHING TOUCHES Choosing your holds will function in mind. For the far left and right sides of your design, choose holds that have a design that will allow you to hang stuff like back packets and jackets. Use any remaining holds to fill in the middle section of the wall where all the climbing will be done. Take a picture and send it to Kenny@atomikclimbingholds.com | ||
55 East 600 South, Provo, Utah 84606
Tel. 801-404-0280
cs@atomikclimbingholds.com

Powered by nopCommerce
Copyright © 2024 Atomik Climbing Holds. All rights reserved.